How to add and install more memory in the Apple MacBook Pro 2009 17-inch 2.8GHz Aluminum Unibody
Step 1: Shutting down your MacBook Pro
- Shut down your MacBook Pro 2009 Unibody. Disconnect the power adapter, Ethernet cable, USB cables, security lock, and any other cables connected to the MacBook Pro to prevent damaging the notebook.
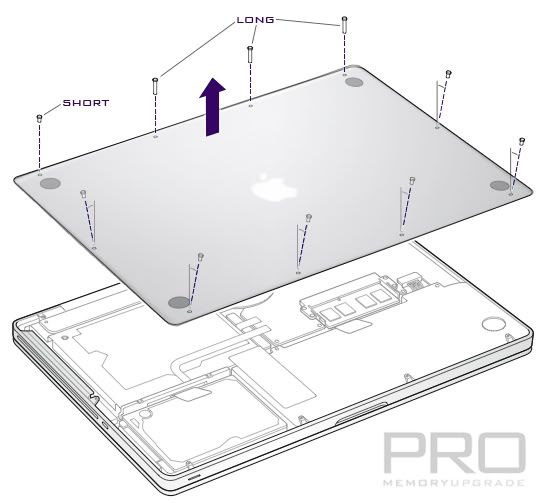
- Turn over your MacBook Pro 2009 Unibody and remove the ten (10) screws that secure the bottom case. Because the screws are different lengths, note the screw lengths and locations so you can replace the screws correctly. Put them aside in a safe place. Lift off the case and place it to the side.

Step 2: Removing static electricity
- Ground yourself by touching a metal surface inside the computer to discharge any static electricity from your body.
- Remove existing memory (if present)
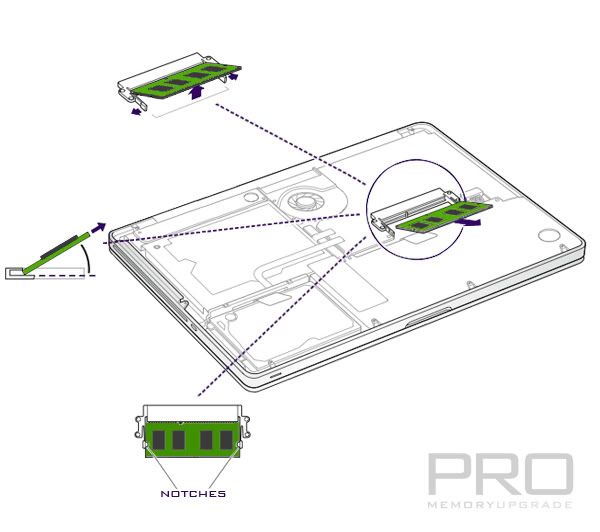
- Push the levers on the sides of the memory module in an outward direction to release the module from the memory card slot. The memory pops up at an angle. Before removing it, make sure you see the half-circle notches. If you don’t see the notches, try pressing the levers outward again.
- Hold the memory module by its notches and remove it from the slot.
- Remove the other memory module.
Important: Hold the memory modules by their edges; do not touch the gold connectors.

Step 3: Install memory (DDR3 1066MHz, PC3-8500 204-PIN SO-DIMM-small-outline-dual-inline-memory-module-ram.html" target="_parent">SO-DIMM)
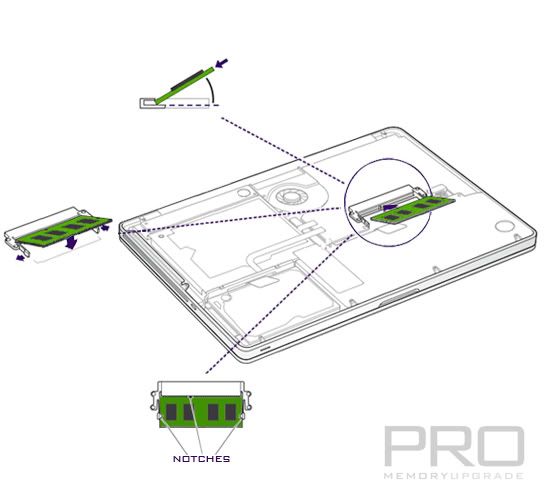
- Align the notch on the gold edge of the module with the notch in the lower memory slot.
- Tilt the card and push the module into the slot.
- Use two fingers with firm, even pressure to push down on the memory module. You should hear a click when the memory is inserted correctly.
- Repeat this procedure to install an additional memory module in the top slot. Press down on the module to make sure it is level.
Note: Make sure your memory is installed according to the illustration below, with the gold contacts inserted almost completely into the connector.

Step 4: After adding the RAM replace the bottom case
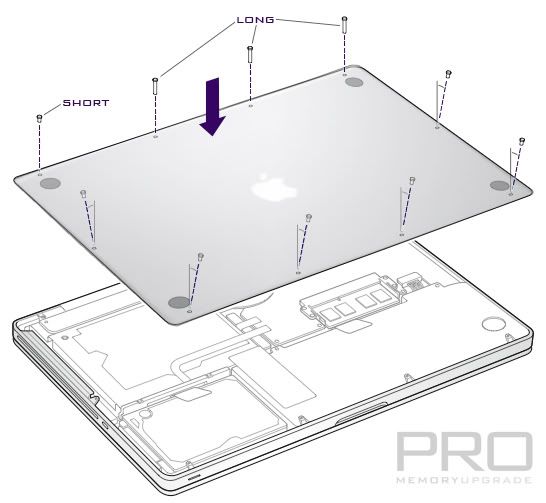
Replace the bottom case. Replace and tighten the ten screws you removed earlier, making sure to put the different length screws in their proper locations.


Geen opmerkingen:
Een reactie posten